Making a big planter usually needs two people but you CAN do it without another person. I did here and it took me awhile, problem solving along the way. First things first, I was told to use the birch. At this point, I was sort of tired of birch or white planters period. White was a big thing this year for planters even though the clothing industries IN colours were purple and green (I find that movies often set the trend for colours for that year aka Joker colours from The Dark Knight).

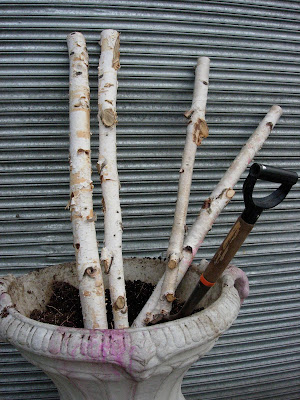
(above) The Birch are tall, about 8 feet in length so I had to cut them in half to make them work for this planter. Anything smaller than four feet and the impact wouldn't have been the same. Birch is just one of those things that you can't go cheap on (if you want it in the planter) no matter what you do. The birch makes the planter through and through. I always make sure to put it on something stable like a table and hold it steady with my foot and hand while Im cutting it through. That way, I don't cut anything major off, like a limb or an artery. Safety is always something to keep in mind when dealing with sharp tools when you're inexperienced.

I dig my hole. obviously you need to do this a little earlier or your soil will be frozen. Below, I had the door to prop my birch against so I could fill in the soil as I went. On a normal, smaller scale planter, we use sand because wet sand sets in the cold and grips whatever is in it like a vice. The problem with Sand is that it's heavy and makes it almost impossible to move (or steal haha).This is concrete and I wouldn't dream of watering it in the cold because it'll crack the product. Also something to think about if you're wanting to put in a live evergreen tree. you still have to water them because they do all their growing in the winter (and its always in the winter that they die because they don't nearly get enough water that they need).

So you may need that second person anyways to hold your birch in place, unless you are against a wall and get crafty. If you have a good look at the birch, I try to pick one long and narrow piece to one thicker one. The variations give a little more eye interest than if they all looked the same and had the same length.
I criss cross them at the bottom. I find it holds them together better and gives me more room to work with around them. remember, the more stuff you pack into it (and around it) the better chance your birch has of not moving in the wind. Plus, doing the criss crossing at the bottom makes the birch splay outwards and takes up more air space at the top.

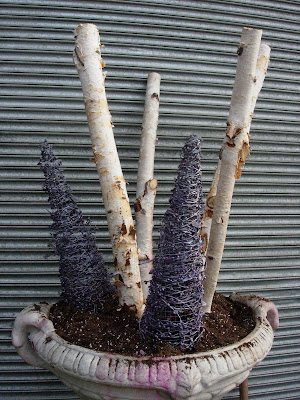
It`s not going to be incredibly even because lets face it, its nature and thats the way things go. My sister wanted me to use these tree things, but we've sprayed them different colour so that they go with the scheme that I want. But don't be fooled, up to this point, I had no idea what I was going to put into the planter. It's all trial and error. But see! My Birch stands up! I really just put those in there like that too keep the birch in place better.
Next, the greenery. I used Ontario Cedar in the middle because its more upright and rigid. I used B.C. cedar on the side because it's lush and has a very nice hanging effect. Using big long branches (boughs) for this one was important because anything smaller and it would just fall out.

I added eucalyptus dyed black as an accent because we love eucalyptus and I really always think it makes the planter better. Because there's so much white in this (white concrete urn, white birch) I needed something to tone it down or it would just go bland on me.

I added the rest of my junk and it took a lot of time to pick and choose through it, to find a combination that I liked. It's just like matching clothes and one little thing can set off the entire planter.

And this is the final product (below)... I actually had to open the door by this point because it just wouldn't fit once I got all the stuff around it. But this was the roadside planter we had done in earlier posts, so it was going to be freestanding on its own and see all theway around. If you're doing a planter with a back to it (a wall) you don't need to do it all the way around and it'll be cheaper for you in the end if you design it with the height closer to the wall and all the junk (fake stuff) in the center. Goodluck!
 The first one didn't turn out as well obviously....


 Tulip bulbs 'queen of night' and yes, this was also a no frills $1.99 purchase. It rocked.
 The Tricolour Beech (upright) in the front. mmmm Nice huh?
 The japanese Maple.
 A planter I had to do at work. Looked nice.
 32 of these wednesday! (above)
 26 of these, I think?
 18 of these, or was that 24?
 Yes this is our mess.
 Assembly line!

 Hanging baskets!


 Putting the junk in. We didn't really put it in randomly. There's a pattern you can make up with bulks of product. You can accent kale with pine cones, making them trail along the side to give it a round appeal, while using bigger pine cones in the middle to give it bulk and height.


 I couldn't find the original butterflies and the red balls were not in there. The customer wanted the balls and I had to make them work, so this was the result of it. I was not too happy with the outcome but I managed to make it look nice and she seemed to really like how they turned out. I think I'm just not a fan of traditional ways of looking. You know? I didn't like the red and green together for some reason but the butterflies made it look a lot better.
 By the time I was done the sixth planter, I was exhausted of this idea and all the fun had tapered out. I like to do original ideas and move onto something else. I'm not as traditional as other people but I can be if I'm feeling the creative vibe that day.