Saturday, December 20, 2008

Make it BIG Take TWO

Making a big planter usually needs two people but you CAN do it without another person. I did here and it took me awhile, problem solving along the way. First things first, I was told to use the birch. At this point, I was sort of tired of birch or white planters period. White was a big thing this year for planters even though the clothing industries IN colours were purple and green (I find that movies often set the trend for colours for that year aka Joker colours from The Dark Knight).


(above) The Birch are tall, about 8 feet in length so I had to cut them in half to make them work for this planter. Anything smaller than four feet and the impact wouldn't have been the same. Birch is just one of those things that you can't go cheap on (if you want it in the planter) no matter what you do. The birch makes the planter through and through. I always make sure to put it on something stable like a table and hold it steady with my foot and hand while Im cutting it through. That way, I don't cut anything major off, like a limb or an artery. Safety is always something to keep in mind when dealing with sharp tools when you're inexperienced.

I dig my hole. obviously you need to do this a little earlier or your soil will be frozen. Below, I had the door to prop my birch against so I could fill in the soil as I went. On a normal, smaller scale planter, we use sand because wet sand sets in the cold and grips whatever is in it like a vice. The problem with Sand is that it's heavy and makes it almost impossible to move (or steal haha).This is concrete and I wouldn't dream of watering it in the cold because it'll crack the product. Also something to think about if you're wanting to put in a live evergreen tree. you still have to water them because they do all their growing in the winter (and its always in the winter that they die because they don't nearly get enough water that they need).

So you may need that second person anyways to hold your birch in place, unless you are against a wall and get crafty. If you have a good look at the birch, I try to pick one long and narrow piece to one thicker one. The variations give a little more eye interest than if they all looked the same and had the same length.
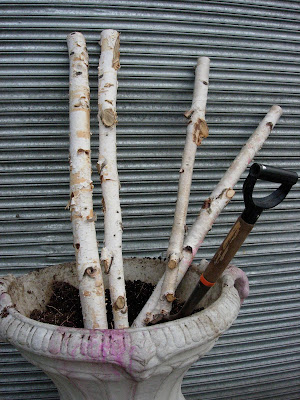

I criss cross them at the bottom. I find it holds them together better and gives me more room to work with around them. remember, the more stuff you pack into it (and around it) the better chance your birch has of not moving in the wind. Plus, doing the criss crossing at the bottom makes the birch splay outwards and takes up more air space at the top.

It`s not going to be incredibly even because lets face it, its nature and thats the way things go. My sister wanted me to use these tree things, but we've sprayed them different colour so that they go with the scheme that I want. But don't be fooled, up to this point, I had no idea what I was going to put into the planter. It's all trial and error. But see! My Birch stands up! I really just put those in there like that too keep the birch in place better.
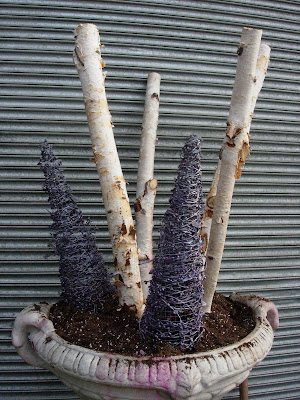
Next, the greenery. I used Ontario Cedar in the middle because its more upright and rigid. I used B.C. cedar on the side because it's lush and has a very nice hanging effect. Using big long branches (boughs) for this one was important because anything smaller and it would just fall out.

I added eucalyptus dyed black as an accent because we love eucalyptus and I really always think it makes the planter better. Because there's so much white in this (white concrete urn, white birch) I needed something to tone it down or it would just go bland on me.
I added the rest of my junk and it took a lot of time to pick and choose through it, to find a combination that I liked. It's just like matching clothes and one little thing can set off the entire planter.


And this is the final product (below)... I actually had to open the door by this point because it just wouldn't fit once I got all the stuff around it. But this was the roadside planter we had done in earlier posts, so it was going to be freestanding on its own and see all theway around. If you're doing a planter with a back to it (a wall) you don't need to do it all the way around and it'll be cheaper for you in the end if you design it with the height closer to the wall and all the junk (fake stuff) in the center. Goodluck!


Let's Make it BiG

Oh My. Big planters are always fun and require at least two people to do them. Well, sometimes. If you want to be a little faster, know what you're doing before hand and the size of your planter. We walked into this job site blind. We didn't really have an accurate size of the planter ('it's THIS big' type of hand gesture big) and we didn't know what the customer wanted. So it was a blind, on site planter. I brought piles of stuff to this site because I wasn't sure what would fit with the colour of it either. Below, its me holding the birch. We took turnsfor the two. She held the birch to begin with while I put in the placement of the plants. Then we switched, I would hold the birch and she would fill in the holes with soil.


Putting the bigger stuff in. Oh and straightening out the birch before we do that. We don't want anything off balance.
Putting the junk in. We didn't really put it in randomly. There's a pattern you can make up with bulks of product. You can accent kale with pine cones, making them trail along the side to give it a round appeal, while using bigger pine cones in the middle to give it bulk and height.


Belated Kale Posting

I should have posted this ages ago when Kale/Cabbage was popular. I kept looking at all the nice varieties and thinking the same thing everyday, that I should take pictures and actually get some information posted. But alas, between picking up and moving, with Sick baby on my hands, I just didn't have time nor energy to post. So now, I give you something to feast your eyes on.

Chidori White Kale.
I'm definitly not a fan of this variety because of the ruffly way it is, but the colour was just too outstanding to pass by. The thing to remember about Kale is it stays green until it gets super cold. The cold changes it and its never a good idea to plant Kale or Cabbage too early because Aphids just LOVE this stuff. Spraying helps but it doesn't too piles once the plant is infected. This plant especially doesn't take well to spraying because the bugs get nice and wedged down deep in the center. ewwww.

'Red Borr' Kale.
This is a special one for me. I had to ask for this one specifically becuase it wasn't on the list but I knew they grew it. It's one of the weirder Kales out there. It's very tall, dark red and stands about hip height (almost three feet with pot included). I always ask for this one and everytime theyonly have a handful before they run out.
(below) Coral Prince.
I THINK this is Coral Prince. I always get them mixed up but I think it is because I remember Coral prince is a little boring than Coral Queen. It's still nice and has the nice pinkish center but not an incredible plant. it doesn't make the impact the way the purples do unless you get a specific variety with it to enhance the colour. Something that's flat and duller than this. hah.


Dinosaur Kale.
True to it's name, its big, more like a grass if you can believe it and it grows odd for a Kale. Very Similiar to Red borr but it has a more upright and fountain effect which makes for that great fall planter when all the grasses are dying off and can't maintain their colour when the cold hits.


Coral Queen.
I just like this one because of the colour in the center and it always makes a great center piece for a planter. It's a wonderful accent too if you add something bright in there like a lime plant of some sort (hakonechloa 'all gold' would do). I think I did that earlier on but I can't recall if I posted it or not. I used this one quite a bit against pigeon purples because they're boring plants but they bring out the interesting colours of the weirder ones. Put boring with weird. It makes for a better combination. If you put too much weird together, it gets too busy and when you put too much boring together.. well... it just gets boring and makes for a real overlooker type planter.


WHY SO SERIOUS!!?!? I AM DR. STRANGE!

Okay, I've mixed two comic book favourites but thats what I'm going with. I havn't been around to post because I've been so busy and with seasonal layoffs, I've had quite sometime to collect photos for Christmas, hanukkah, diwali adventures and spirit.


I'm considered the Dr. Strange of the greenhouse planters. I always make them weird. I like them weird. Different and once I've done that different planter, I like to move onto something else. This one is just a rip off of another one that I did earlier on for the seminar. Except its in black. This was the third set of planters that I did, but you can see the steps I went through to make it the way I did. The green ball in the planter is fake. It's a good product because the colour is infused into the plastic so it prevents fading. Doesn't prevent dust from getting on it though. Remember that when buying fake plants!


I made this one with no intention of selling it. It was for the seminar, so that people could see how they can look and what they can do with the product we have or whatever they have around the house. Sometimes I wish I was this creative at home. I find I'm just lazy when it comes to my own house because all the creative juices are sucked out at work.


This is a customer order after seeing the seminar one (the original) but I didn't have certain products for it so I had to wait for the orders to come in. This was half done.
I couldn't find the original butterflies and the red balls were not in there. The customer wanted the balls and I had to make them work, so this was the result of it. I was not too happy with the outcome but I managed to make it look nice and she seemed to really like how they turned out. I think I'm just not a fan of traditional ways of looking. You know? I didn't like the red and green together for some reason but the butterflies made it look a lot better.


This planter is the original one, with the original butterflies that I had meant to take apart but they made me sell it. haha. It was a huge pain to secure but once I had it in there, it wasn't going anywhere. Unless it was extremely windy or getting 35 cm of snow like we did yesterday.

By the time I was done the sixth planter, I was exhausted of this idea and all the fun had tapered out. I like to do original ideas and move onto something else. I'm not as traditional as other people but I can be if I'm feeling the creative vibe that day.